Background PDF Problems

Using a PDF as a background can sometimes cause problems. PDF documents are created in a different way by a variety of applications. It happens that these PDF documents are not compatible for use as a background or watermark PDF. Especially PDF documents created by Adobe products have incompatible color models or other advanced unsupported features.

The problems can result in different types of errors. Sometimes the colors are not correct and other times you will get a blank page followed by a page with cryptic error information.

This is what the error page could look like:

ERROR:
typecheck
OFFENDING COMMAND:
repeat
STACK:
--nostringval--
-mark-
-mark-
-mark-
-mark-
-mark-
-mark-
-mark-
-mark-
-mark-

Solution

The solution is to print the background PDF to a new PDF using the PDF Printer. You can try to print it using different PDF viewers. They have different ways of printing the PDF and the resulting PDF will have different properties depending on the viewer that printed it. Usually, you can create a working background PDF this way.

I suggest that you try to print it from the following PDF viewers:

Bullzip PDF Studio

SumatraPDF

Adobe Reader

Printing to PDF from Firefox or Chrome

Firefox and the Google Chrome browser renders print jobs as graphics instead of text. This means that the PDF Printer does not see the actual text that is printed but only a picture. Therefore, you cannot copy and paste text from a PDF printed from Chrome.

You can use Microsoft Edge to print your web page and get a PDF with searchable and copy/paste capabilities.


Print to printer and PDF at the same time

With the PDF printer, you can send the newly created PDF to a real printer after the PDF is saved. This enables you to implement a workflow where you create a PDF archive of all your print jobs.

This post will show you how to create such an archive printer as a separate printer on your system.

First, you download the latest PDF printer and install it from a command line with the following command line switches:

Setup_BullzipPDFPrinter_11_1_0_2600_PRO_EXP.exe /SILENT /PRINTERNAME=”Archive PDF Printer”

This will install a new virtual PDF printer on your computer. The new printer is named “Archive PDF Printer”. After the installation has completed, you can use this printer as a normal PDF printer.

We need to configure it to send all print jobs to a PDF archive folder and to another real printer. This is done with the global.ini file in this location:

C:\ProgramData\PDF Writer\Archive PDF Printer\global.ini

Open the global.ini in a text editor and add the following lines:

[PDF Printer]
 Output=C:\Archive\<username> - <date> <time> - <guid>.pdf
 ShowSettings=never
 ShowSaveAS=never
 ShowProgress=no
 ShowProgressFinished=no
 ShowPDF=no
 ConfirmOverwrite=no
 PrintToPrinter=yes
 PrinterName=Microsoft XPS Document Writer
 PrinterSelection=Specific

The output setting specifies the name of the saved PDF document. The output name uses macro names that will be substituted by real information at run time. You can see a complete list of macros here:

Click here to see all the Macro tags

All the show settings control the dialog. The settings used here will hide the printing dialog and automatically save the PDF.

The printer settings control how the PDF document is printed to a normal printer.

You can read about more show and printer settings here:

Click to see a complete list of PDF printer settings

Please note that you need the expert edition to send the document to a normal printer.

Split PDF pages in multiple files

You can use the PDF Printer to split a PDF into multiple files. Each file will have one page from the original PDF.

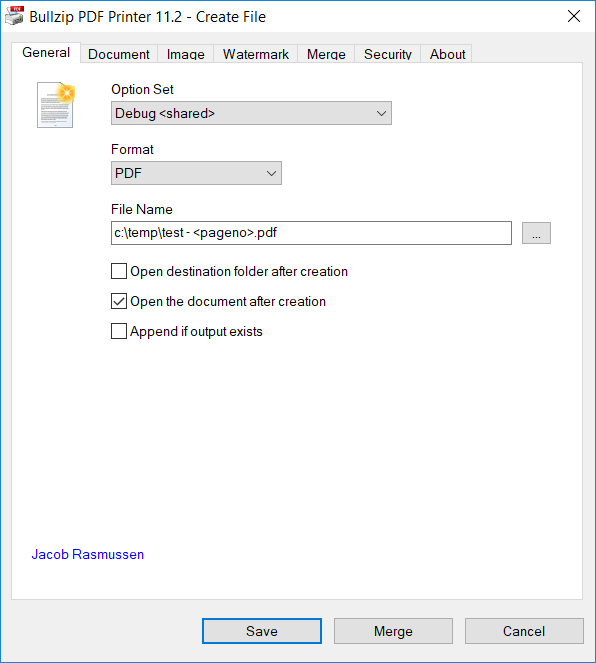
It is as simple as adding the <pageno> macro name to the output file name. Here is an example:

Split PDF

Using the file name “test – <pageno>.pdf” will result in files named “test – 1.pdf” for the first page and so on.

Additional formatting can be added to the page no. If you write <pageno,3> the number will be zero padded to the length of 3 characters. The padding character can be specified as an additional parameter such as <pageno,3,->. This will create a page number like –1, –2, etc.

See the documentation about macros for more information.

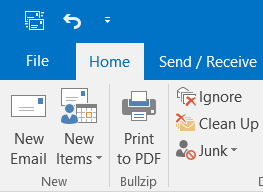
Print PDF from Microsoft Outlook

This post contains a VBA macro that will set the output file name to a cleaned version of the subject. The selected mail item is then printed.

Note that Outlook remembers the last printer used. Therefore you have to use the PDF printer before you run this macro. Otherwise, Outlook will just print to another printer.

Option Explicit

Public Sub PrintPdf()
  Dim mi As MailItem
  Dim o
  Dim p As Integer
  Dim subj As String
  Dim illegalchars As String
  Dim i As Integer
  Dim output As String
  Dim settings As Object
  
  For Each o In Application.ActiveExplorer.Selection
    If TypeName(o) = "MailItem" Then
       Set mi = o
       subj = mi.Subject
   
       Rem -- Clean reply and forward prefixes
      Do
         p = InStr(1, Left(subj, 4), ":")
         subj = Trim(Mid(subj, p + 1))
       Loop While p > 0
    
     Rem -- Remove illegeal file  name characters
     illegalchars = "<>:""/\|?*" 
     For i = 1 To Len(illegalchars)
       subj = Replace(subj, Mid(illegalchars, i, 1), "_")
      Next
    
      Rem -- Remove double underscores
      Do
        p = InStr(1, subj, "__")
        subj = Replace(subj, "__", "_")
      Loop While p > 0
    
      Rem -- Create the COM settings object to control the printer.
      output = "C:\Temp\" & subj & ".pdf"
      Set settings = CreateObject("bullzip.PdfSettings")
      settings.SetValue "Output", output
      settings.SetValue "RememberLastFolderName", "no"
    
      Rem -- Write settings to the runonce.ini.
      settings.WriteSettings True
    
      Rem -- Print the object
      Debug.Print "Printing: " & subj
      mi.PrintOut
    End If
    Exit For
  Next
End Sub

When you have created the macro, you can customize your ribbon and give it an icon.

outlook-macro

Excel preview shows many pages but strange or no output

Some Excel sheets show a strange behavior when you print them or do a print preview. This can be caused by the wrong DPI setting for the Excel sheet you are looking at.

It is easily fixed if you change the DPI setting to something meaningful.

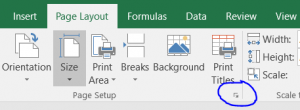
First, you click the small icon on the Page Layout tab.

excel page layout

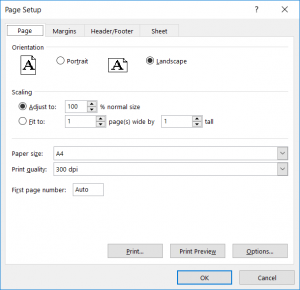
Second, you change the print quality to something like 300 dpi.

excel page setup

Now, you should be able to print your document.

Color problems with a background PDF

Some PDF documents change the colors when they are used as background for another PDF. This is often the case for PDF files created with other tools where the color information is not fully compatible.

Print PDF to a new PDF with Bullzip

You can often get the colors right if you print the existing background PDF to a new PDF using the Bullzip PDF Printer. Simply open the background PDF in Adobe Reader and print it to the Bullzip PDF Printer. Then use the new PDF as the background PDF.

If this doesn’t work, you can try the same procedure with at different PDF viewer. Instead of Adobe you can use Bullzip PDF Studio or Sumatra PDF Reader, which are free readers available for download on the Internet. This has often produced good results.

PDF Compatibility Level

You can also try to change the compatibility level of the PDF that you create. This can also be used when you create the background PDF by printing it from another reader as mentioned above.

PDF Color Model

In the PDF options dialog, there is an option to change the color model used, when creating a PDF. Try to experiment with that as well.

Hopefully, one of the strategies mentioned here will help you solve the color issue when using another PDF as a background. These methods should all preserve the vector based information intact and deliver the best quality possible.


Merging of PDF files

In this article, I will try to explain why some users experience problems when merging multiple documents.

The printer is designed to process print jobs in parallel. This means that it will start processing a job even before the previous job has finished processing. Consequently, you can run into trouble if you expect to merge the current print job with a previous one that has not finished yet. The result is that you get a document with missing pages.

One solution is to wait for the previous job to finish before you start the next one. This requires that you control the creation of the documents in the print queue.

Another solution is to tell the PDF printer to stop processing jobs in parallel mode and do it one by one. You control the processing with a registry setting called GUITimeout. The use of the GUITimeout setting is described in the BioPDF documentation.

Switching to sequential mode will lower the performance when processing multiple jobs. Another side effect is also that on Citrix or Terminal Servers, one user can block the job processing for another user. Other than that, the setting is safe to use.

Save to same path

Users often ask if they can make the printer save the PDF document in the same folder as the original printed document.

This is not possible because the printer does not know anything about the original document. It only processes a print job which does not contain any information about the path of the original.

DEP crashes programs on Windows Server 2008 R2

If you experience random crashes on Windows Server 2008 R2, you may have a problem with the DEP (Data execution protection).

On Windows 2008 R2 there seems to be a problem with DEP. We have seen the crashes stops if users disable it for the gui.exe process or entirely. Often the crashes are logged by the Windows Event Log. According to the log they stem from random DLL files with no association with the PDF printer.

Here is how to disable it:

Open Control Panel, click on System and Security→ System → Advanced system settings. In the Advanced tab, click on the Settings button in the Performance section (the first one). In Performance Options, Data Execution Prevention has its own tab.

The odd thing about this finding is that has only been seen on Windows Server 2008 R2. Earlier or later versions of Windows Server has not shown this problem.