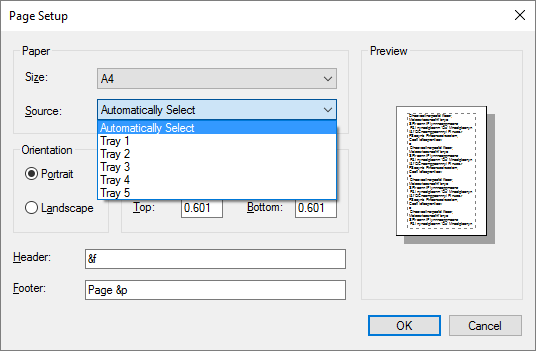
By default, the PDF printer does not have any paper trays installed. However, you can add virtual trays to your PDF printer if you want.
In this example, we will add 5 trays for debugging purposes. The trays will be named Tray 1 through 5 and they will each add the tray name to the printed page.
To install the trays, you simply add the following lines to the end of the printer’s PPD file:
*InputSlot Tray1/Tray 1: "gsave /Times-Roman findfont 30 scalefont setfont newpath 10 10 moveto 1 0 0 setrgbcolor (Tray 1) show grestore"
*InputSlot Tray2/Tray 2: "gsave /Times-Roman findfont 30 scalefont setfont newpath 10 10 moveto 1 0 0 setrgbcolor (Tray 2) show grestore"
*InputSlot Tray3/Tray 3: "gsave /Times-Roman findfont 30 scalefont setfont newpath 10 10 moveto 1 0 0 setrgbcolor (Tray 3) show grestore"
*InputSlot Tray4/Tray 4: "gsave /Times-Roman findfont 30 scalefont setfont newpath 10 10 moveto 1 0 0 setrgbcolor (Tray 4) show grestore"
*InputSlot Tray5/Tray 5: "gsave /Times-Roman findfont 30 scalefont setfont newpath 10 10 moveto 1 0 0 setrgbcolor (Tray 5) show grestore"
The PPD file is normally located here:
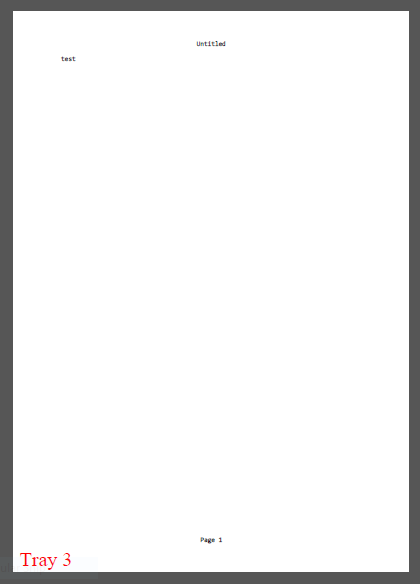
C:\Windows\System32\spool\drivers\x64\3\BULLZIP.PPD
Just save the changed the PPD file. Windows will automatically detect the change and use the new settings.
When you print from a program like Notepad and select Tray 3, you will see something like this:
Note: Paper trays are also called paper bins or paper sources.
3 thoughts on “Paper Trays on the PDF Printer”
Comments are closed.