You can make the PDF printer attach and send the output via email. It can open your email client and create a new mail ready for editing or it can send the mail automatically via SMTP.
If you check the email option on the general tab of the configuration dialog then it will try to use your default email client to open the new email.
Advanced options are available using settings in the configuration files. You can set the email client to auto (default), outlook, smtp, mapi, mapi32, or mapi64 to help it select the correct email client for opening or sending the mail. These and other advanced settings are normally set in the global.ini configuration file.
All the email settings are listed here: https://www.biopdf.com/guide/settings.php
The settings can be set directly in configuration files or via the Microsof.NET and COM programming interfaces.
If you experience that the printer is opening the wrong email client then you can try setting another via global.ini.
The runonce.ini is a configuration file used to set the parameters for the next print job. It is typically used by programmers to specify how a PDF should be created and where it should be saved.
In structure the runonce.ini is a normal ini configuration file with a main section and simple name value pairs in a text file. It can look something like this:
A runonce configuration is only meant for one print job. When the printer sees a runonce configuration it will read it and delete it, so that it does not affect the next job.
Concurrency
Printing is an asynchronous process where a program places a print job on the print job queue. Job on the print queue is handled by the Windows Spooler process and sent to the individual printers. Therefore, a program cannot know when a specific print job is up for printing. It can send it to the queue but then it is up to the Spooler.
When printing multiple jobs without any pause between the jobs, you risk overriding a previous runonce.ini before it has been picked up by the corresponding print job. There are basically two strategies you can use to avoid this problem.
The first is to wait for your print job to finish before sending the next one. Let’s say that you are a programmer and want to print multiple PDF documents in a loop. In this case it is recommended that you use the statusfile setting to specify a unique status file name for each job. After you have written the runonce configuration and sent the job to the printer, you wait for the status file to appear. When you see the status file, you can read it and move on to the next job. The benefit of waiting for a status file instead of the actual document is that the status file will also be created in case of an error. The other benefit is that the resulting PDF document is completed when the status file is written. If you simply look for the PDF document then it may not be complete when you first see it in the file system.
The second method require that you can control the name of the print job in the printer queue. This is possible from many programming languages but it may not be possible in other systems. If you can set the print job name then you can create a specific runonce configuration that will only be picked up by that particular print job. More information is available here:
In case you need a high throughput of print jobs, you can install multiple printers with dedicated printer ports. You can read more about Printing to multiple virtual printers simultaneously here:
The runonce configurations are user specific. This means that runonce files from one user does not affect other users on a system with multiple users. This means that it is safe to use on a Terminal Server.
Creating Runonce Files
Given that the runonce is a simple text file, you can use any programming technique for writing text files to create a configuration. The location and character encoding are documented here:
Instead of writing the configuration files directly, it is recommended that you use the API to do that. The API will know the correct location for the current users on the specific version of Windows. The API is available in both COM and Microsoft.NET versions.
Examples
This is a link to an example of how to use the runonce from code:
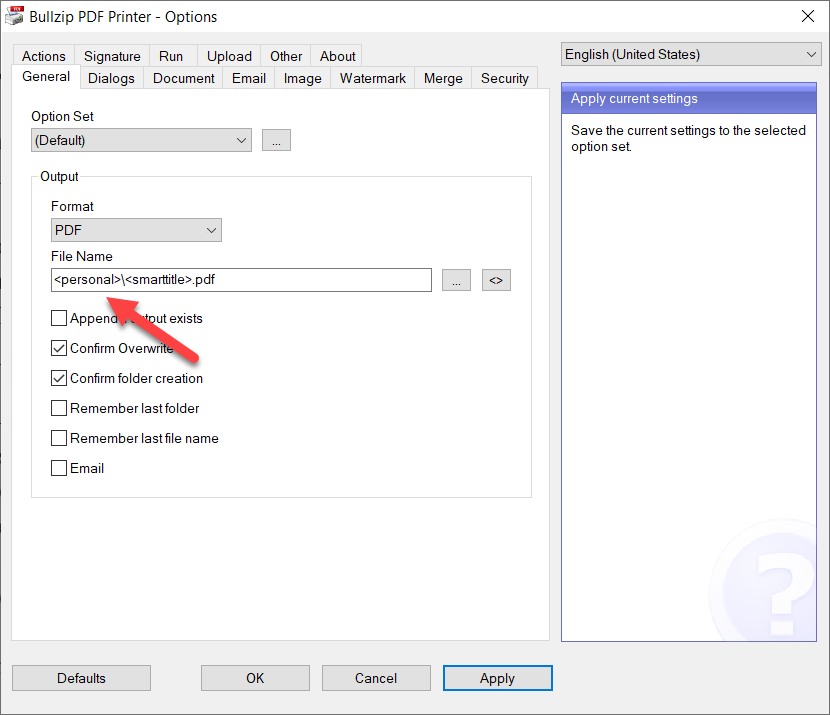
How do you set up the default save location for your PDF documents? This is a common question we get from the users of the PDF printer.
The answer is simple, and the possibilities are endless if you want to do advanced stuff.
First the simple answer
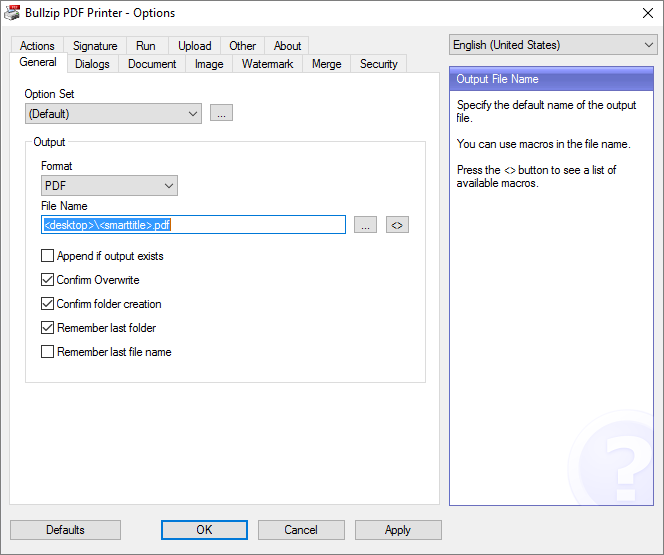
You simply open the Options dialog from the Start menu. In there you change the File Name setting to your preferred location and file name.
When you specify the output path, you can use Macro Tags to make the file name Macro Tags to make the file name a bit more flexible. These tags are substituted with dynamic values that may depend on the current date and time or settings on your specific machine. It can also get information from the print job or even run a script.
The most used tags include <desktop>, which points to the location of the desktop, or <personal>, which is your personal documents folder on the machine.
This is what it looks like:
Setting a default PDF file name
Now, the advanced answer
The macro tags can tap into information such as environment variables, system time, print job information, counters, unique id generation, and running scripts.
You can learn more about these macros at the BioPDF web site.
Information about the default save location is stored in the Output setting in the configuration files.
What about the name of the source document?
Users ask us why there isn’t a macro for the name and location of the source document. For example, this could be the docx file printed from Microsoft Word or a text file in Notepad.
The problem is that we need to know the source document’s file name. Unfortunately, all the printer see is a print job, which does not contain information about its origin. Instead, it has a limited set of properties set by the printing application. These include the author and the document name, but it is entirely up to the printing application to set those to something meaningful, and again, the source file name and location are not among them.
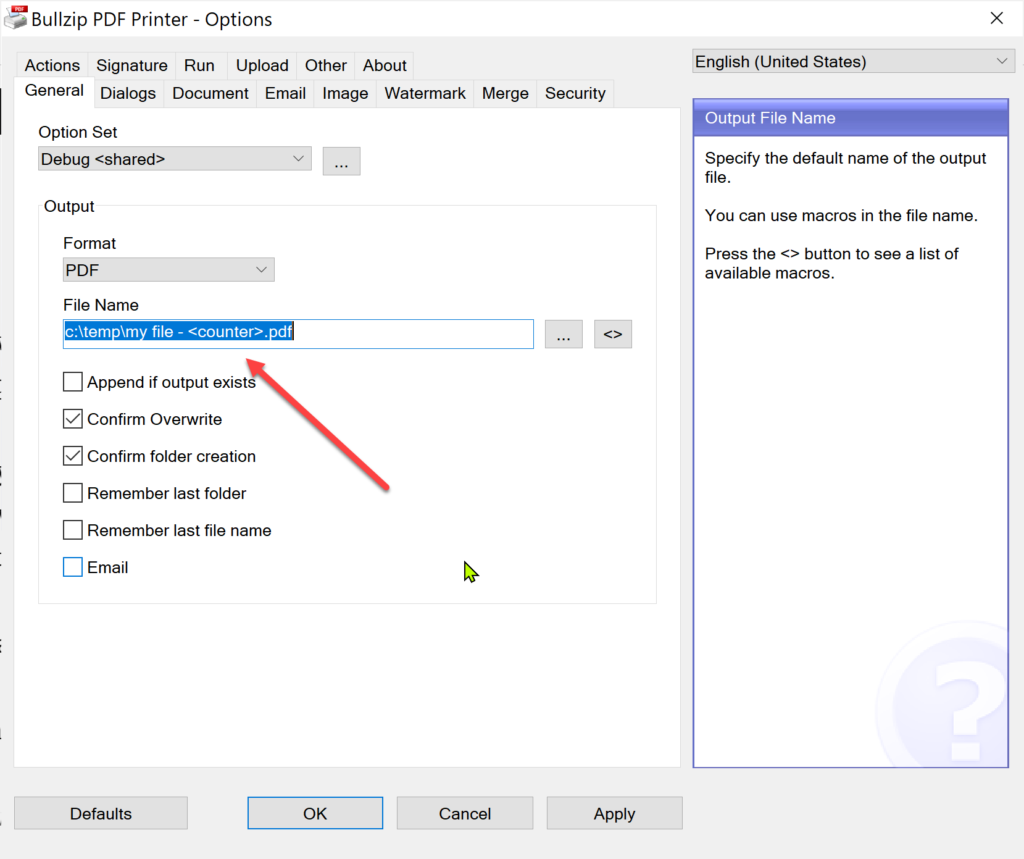
If you want the printer to generate file names automatically and have a counter or unique id as part of your file name, this will show you how.
When you open the printer options from the start menu, you can set a file name to use when a print job is created. This file name can contain tags, which are substituted with other values when printing.
Tags can give you information such as timestamps, user names, machine names, and much more. A couple of these tags have functionality for counters and unique id generators.
Here is an example where a counter is used.
Preset a file name with a counter
Every time the printer is used the <counter> tag will increase by one.
The list also contains a <random> and a <guid> tag for generating file names with a random part or a GUID (globally unique identifier).
You can add parameters to counter and random tags. It is also possible to have multiple counters and you can preset values for these counters if you like.
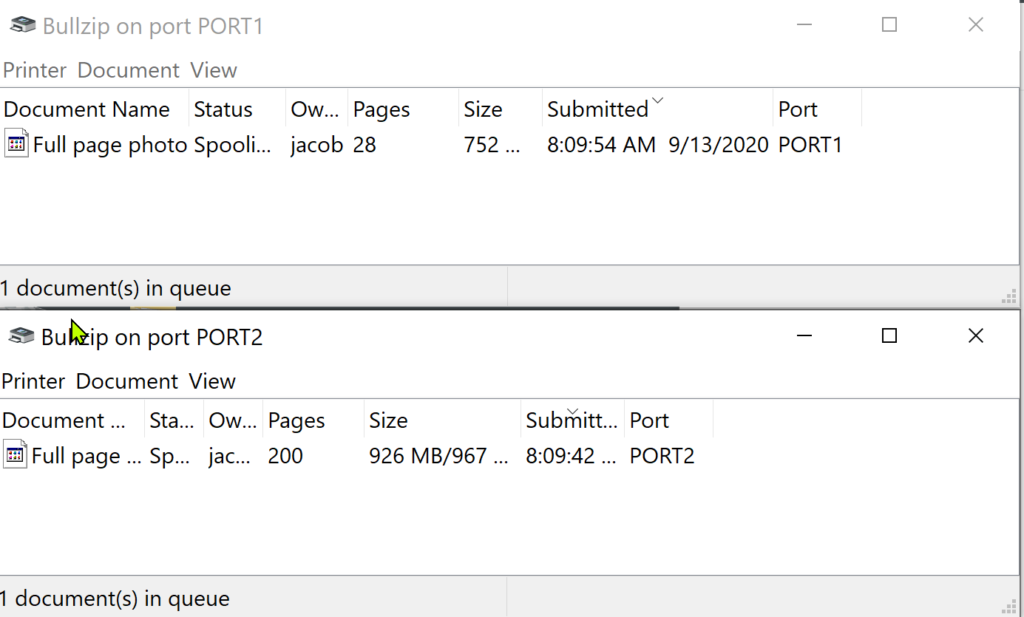
We have been asked by system administrators if it is possible to print to many PDF printers at the same time. It is now. Starting with version 11.14, you can create multiple printer ports during installation. Before this version, the limiting factor was that even if you had multiple virtual printers, they would all use the same virtual printer port. This means that one printer had to wait for the other to finish spooling the print job.
When you install a new PDF printer with a custom name using /PRINTERNAME=”My printer”, you can now add a custom port for this printer. The port is added with /PORT=”MYPORT”. This will give you a printer named My Printer connected to MYPORT. This means that the new printer can spool and print individually from other printers on the same machine.
Example of running the setup to add the new printer:
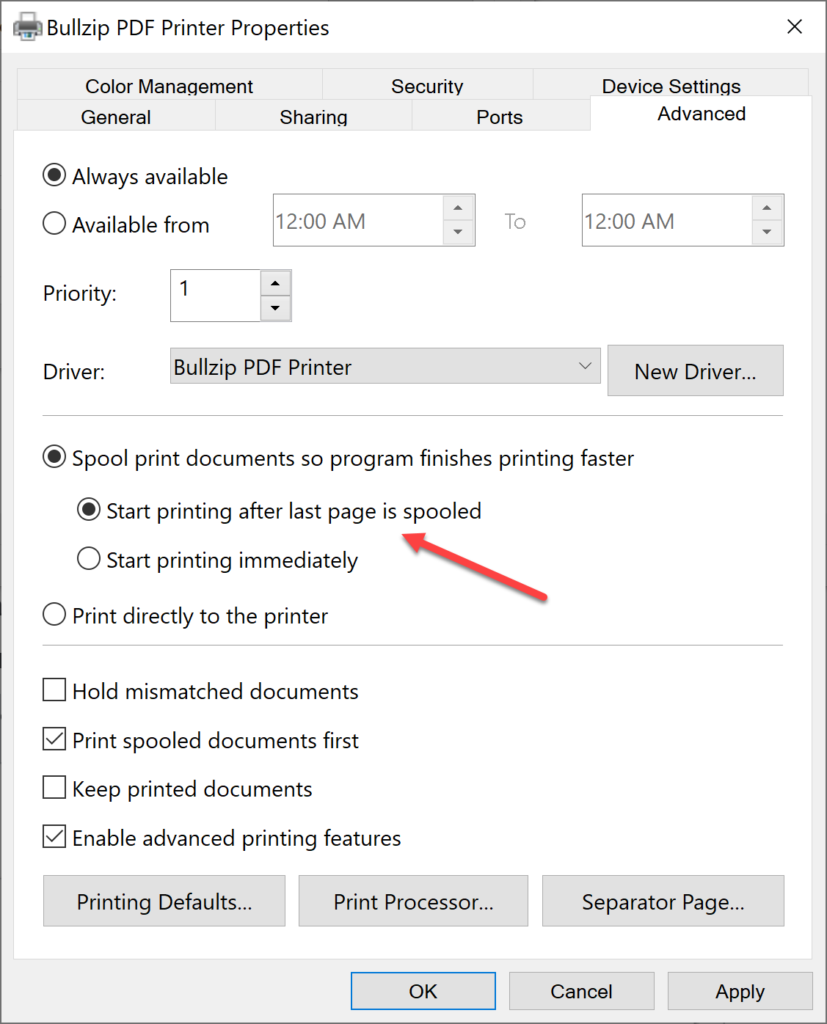
Another optimization of the printing speed is to change the spooler options to Start printing after last page is spooled. This helps if one print job is taking a long time to finish printing. Usually, the spooling is faster than the printing for the virtual printer.
Start printing after last page is spooled – Advanced Printer Options
One caveat of this option is that if you use the runonce.ini
to control the parameters of the print job, you no longer know the order of the
print jobs. This means that unless you have unique names for your print jobs
the runonce.ini files may not be used with the print jobs they were meant for.
If you can control the names of the print jobs from the
printing application, then you can use the runonce_jobname.ini file
names to match the print jobs and the configurations.
Fast PDF Printing
The fastest printing is achieved by creating a configuration for the printers that generate automatic file names and disable the printing dialogs so that printing is unattended. On top of that, you should create multiple instances of the printer with different names and individual port names. Spooler settings should be set to start printing after the last page is spooled.
Two large print jobs printing at the same time
Feedback
Please send us an email if you have feedback for this
article.
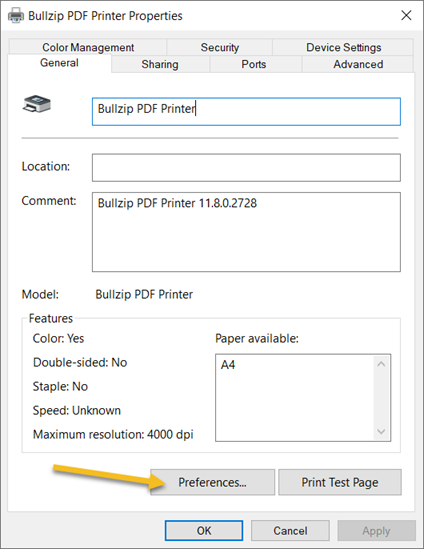
When printing, you will encounter a couple of places where you can change the printer settings. Two of these places are found in the printer’s property dialog.
On the General tab, you can click the Preferences button and change the printer settings for the currently logged in user. This means that you can change your own settings for this specific printer. The changes that you make here will not affect other users.
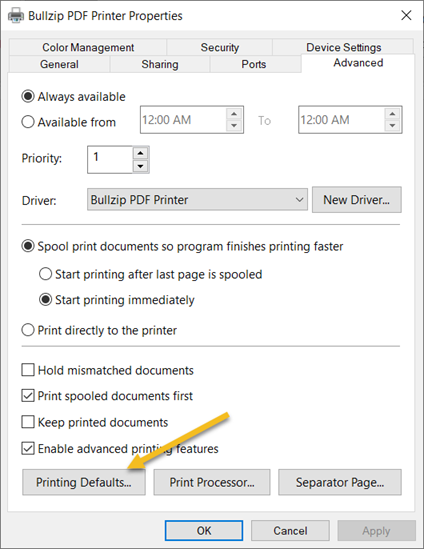
If you go to the Advanced tab and click the Printing Defaults button, then you will see a similar dialog. However, this time you are looking at the settings on a machine level. This means that when you change the settings here it will affect the users that don’t yet have their own preferences set.
New users will inherit the settings from the Printing Defaults.
Sometimes, the user’s preferences are reset by Windows. This can happen during Windows updates, reinstallation of the printer, or GPO changes. Other events may also reset the settings.
The printer uses a settings file named global.ini. This file contains settings that will be forced on to all users on the machine. Normal settings are specific to the user, whereas the settings in global.ini applies to all users.
By default the global.ini is located in the folder:
C:\ProgramData\PDF Writer\Bullzip PDF Printer
The last part of the path is the actual printer name it applies to.
On different language specific versions of Windows the name ProgramData may be something different.
You may find yourself in a situation where you are migrating your applications and data to a new workstation or server. The PDF printer may be part of this migration and you would like to know how to get the settings from the old machine to the new machine. In that case, this article is for you.
Install the PDF Printer
Unless you really have a good reason to install the same old version of the PDF printer as you had on the old system, I strongly recommend that you use the latest installer to install your new PDF printer. Download and install the latest available version before you try to move the configuration.
Moving the settings
The printer has a set of global settings and possibly some user specific settings to.
Global settings
In C:\ProgramData\PDF Writer\Bullzip PDF Printer you will find the global settings in a file named global.ini. You can copy this file to the same location on the new machine. These settings apply to all users on the system.
User settings
The users have their settings stored in settings.ini found in %APPDATA%\PDF Writer\Bullzip PDF Printer.
Shared option sets
Option sets shared between users are located in the folder C:\ProgramData\PDF Writer\Bullzip PDF Printer\Option Sets. The files can be copied to the new machine.
By copying the files mentioned above, you should get a PDF printer behavior, which is more or less the same as on the old system.
Transfer the License
If you have a license on your old computer, you can move it to the new computer. The license file is named license.xml. It is located it the printer’s program folder. This is typically under C:\Program Files\Bullzip\PDF Printer. Simply move the file and you are done.
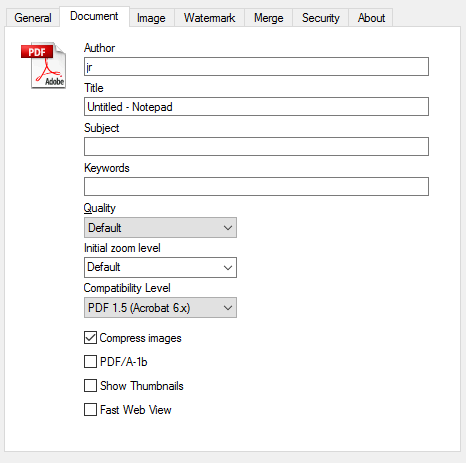
When you create a PDF document your images are normally stored in a compressed format. The PDF creation process basically chooses between two compression types. Depending on which types of images you have in your PDF, you may prefer one over the other.
JPEG image compression
The JPEG compression is well suited for documents with photos. Images are compressed with a loss of information but it usually produces good pictures and reduces the size significantly.
FLATE image compression
In contrast to the JPEG compression the FLATE compression is lossless. The images are preserved and it does not introduce the noise pixels along sharp edges as you will find when JPEG compression is used. Therefore, this type of compression is preferred if you have images of diagrams or images containing text.
Compression selection
You can change the compression type, using different settings in the PDF configuration. If the Compress images is checked on the Document tab, then the JPEG compression is used. If you uncheck it, FLATE compression is used instead.
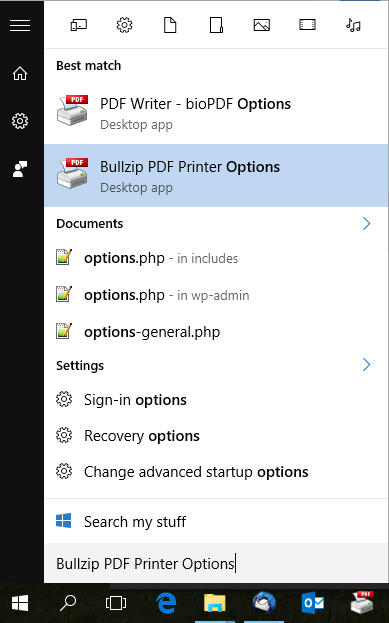
The printer’s options dialog is where you configure all the default settings for the PDF printer.
Opening the options dialog
You open the options dialog from the Windows Start Menu. In Windows 10 you can open the start menu and start typing the word options. Then it will show up in the list.
In Windows 7 you can also find the options dialog in the start menu. Browse to the Bullzip folder and click the PDF Printer menu entry.
Once the dialog is open, you can start changing the default values. Click Apply or OK to save the changes.