Adding a printer manually

Sometimes the installer fails to add the PDF printer to your list of installed printers. There can be many reasons for that. Maybe your system does not have the normal drivers available because your system administrator deleted them to save disk space. Maybe your spooler service is disabled for some reason or other things could be the problem.

When you troubleshoot the printer installation, it can be a good test to see if you can install the printer manually through the normal Windows interface to do so. This article will show you the steps to do that on a Windows 10 system. Most other versions of Windows have similar dialogs but they may look slightly different.

Open your Devices and Printers window.

Click the Add a printer menu item.

Click The printer I want isn’t listed

Add a local printer

Choose the BULLZIP port

Locate the Microsoft PS Class Driver and select it.

Replace the driver if needed

Name the printer

Finding the installation log file

In case the installation of the PDF printer runs into problems it can be useful to send the installation log to our support. You can locate the installer log in your folder to temporary files. To get to that folder you simply enter %temp% in the address bar in your Windows File Explorer.

After you hit enter, you are taken to the folder for temporary files. Look for a file named Setup Log plus the date.

Once it is located, you can easily attach it to an email.

Additional PDF printers with custom names

Sometimes it can be useful to have multiple PDF printers with different configurations. This is possible and here is how.

When you want to have an additional printer installed you should run the setup program with the /PRINTERNAME command line switch. Please note that the PDF printer will stop working if you rename the printer after it is installed. Therefore, it is necessary to install the additional printer using this switch.


This command line will install a second PDF printer named My second PDF printer. After it is installed, you can configure it using the options dialog from the start menu.

Append to PDF without dialogs

This article outlines how you can use the PDF printer to continue to append to the same PDF document without showing any dialogs when you print.

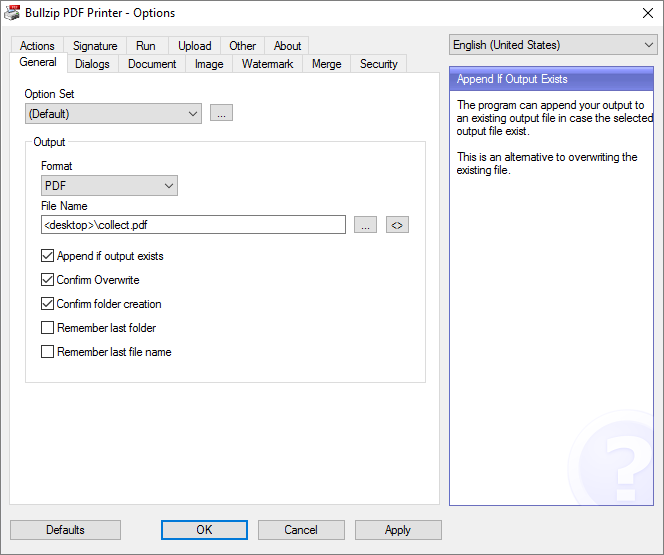
The first step is to open the options dialog from your start menu. This is where we set the default settings for the printer.

You should define an output file name. This is the file that will collect our print jobs over time. Each time you want to start over, you should delete this file. In addition to that you enable the Append if output exists.

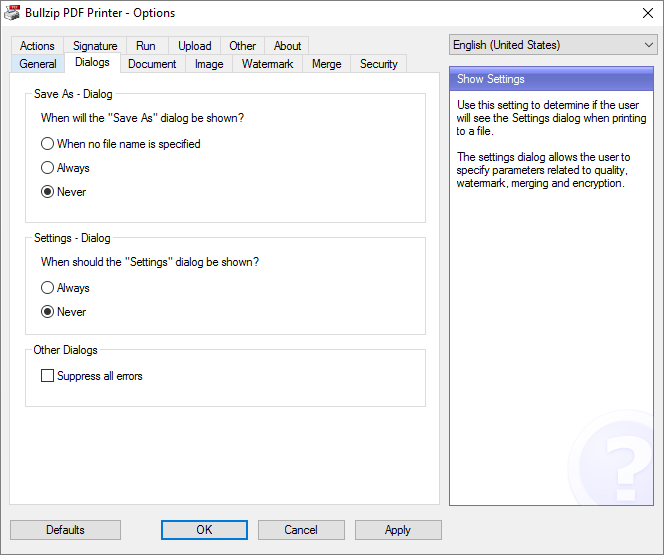
On the Dialogs tab, you select never and never to hide all the dialogs.

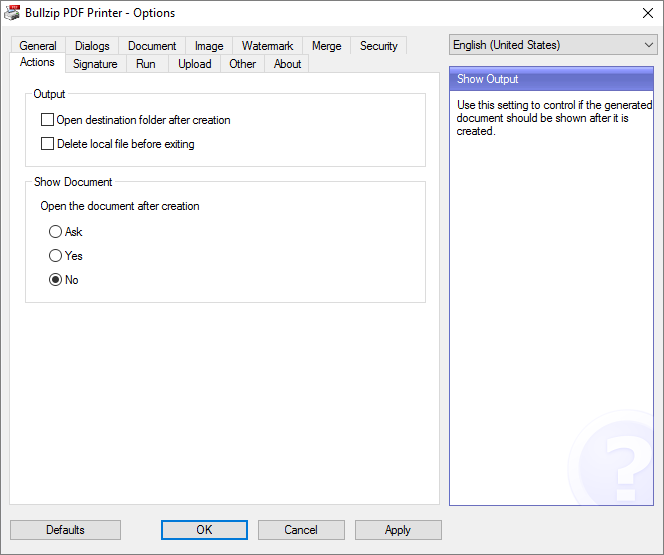
Select no in Open the document after creation to prevent the PDF from opening when the print is finished.

That is all. Now you can print to the PDF printer and it will continue to build you collect.pdf on your desktop.

If you is something you need on a regular basis, you can install a second PDF printer with another name and configure that to collect the print jobs.

Default Printer Properties

When you install the PDF printer, the setup program will try to decide which default printer settings are best for you. It will look at the country code of your computer and determine if the default paper size should be A4 or Letter. It will also set things such as the default printer resolution in DPI and other stuff.

Some of these settings can be set to specific values during the installation using the command line switches for the setup program. You can also change the default settings after the printer is installed. Here is how you can do that.

First you go to the Devices and Printers window in your control panel. You right click the PDF printer and select Printer properties.

In the dialog for printer properties, you click the Printing Defaults button on the Advanced tab.

This brings up a new dialog where you can set paper orientation and some other things.

From here you can click the Advanced button and get even more choices such as pater size.

Installing PDF Printer

This is a description of how you install the Bullzip PDF Printer. The dialogs shown in this walk-through is from an installation on Windows 10. If you have a different version of Windows, the dialogs may look slightly different.

When you run the downloaded setup program it will ask for administrator access to install the software on your PC.

The first step of the installation will prompt you for the preferred language. This will determine the language of the installation process and the default language for the installed PDF printer. You can always change this later in the PDF printer options dialog.

A license agreement is shown after the language selection.

The PDF printer depends on other components to run. It can download these components automatically for you. Normally, you want to install all these components. They are all needed for specific features and does not contain any mallware as you sometimes find with other software installers.

Installation can take a short while. Be patient.

When the installation is finished, this screen is shown.

You are new ready to print your first PDF file.